
My intention was to minimize my investment and to try and build the whole warband out of one box of Clan Rats. Sadly, I had to wait almost 6 weeks to get the box delivered and missed the first couple of weeks of the league... I therefore decided to go for better weapons instead of more bodies to have a better chance against warbands which already gained a couple of upgrades.
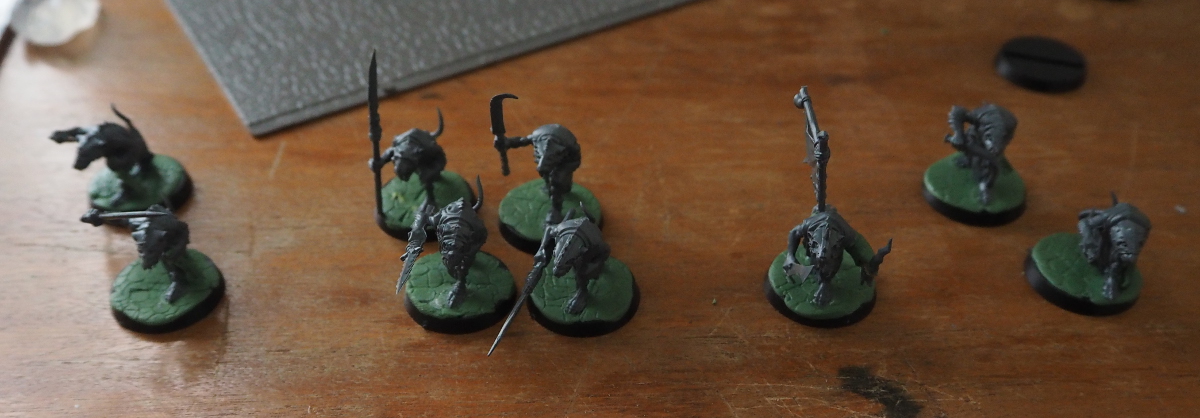
My warband started like this:
Assassin Adept - Weeping Blades, Sling
2x Black Skaven - Fighting Claws
2x Night Runner - 2nd Dagger, Sling
2x Verminkin - Sword, Sling
4x Verminkin - Spear
(The league rules limit ranged combat weapons to 5 per warband).
When the box finally arrived I realized that the left arms are all sculpted onto the body and that there are only two different right arms with Fighting Claws. Luckily I have some Instant Mould so I just made primitive push moulds of the parts to copy them:

After a bit of cleaning the result wasn't too bad:

I cut away most of the Green Stuff and fitted the claws to the bodies:

The Assassin Adept needed some conversion, too. I cut away the left arm and replaced it by one from a Perry Miniatures British soldier:

The new arm is too small, but I will hide it under a sleeve made of Green Stuff.
I made some slings out of Green Stuff, too:

Last, but not least, I used more Instant Mould to make a mould for the bases:


By now the warband is completely built and partly painted. As I mentioned above, I've had a first game that ended with mixed results. It was a 5 player game with only one objective in the middle of the table and I got steamrolled by a large warband of Marienburgers. Both my Assassin Adept and one of the Night Runners took a crossbow bolt to the face and two of the Verminkin were taken out of action by a frenzied swordman and a blunderbuss. So my warband broke in turn 4 with only causing one casualty.
Nevertheless, I was lucky when I rolled for the after game actions. I found 3 shards of warpstone and an overturned cart, resulting in 63 gold crowns. My Assassin Adept earned Horrible Scars and now causes fear. The Night Runner will miss next game, and both Verminkin survived. Not too bad ;)
I am not quite sure what to do with my new fortunes. Maybe I get some crossbows...
But if you buy crossbows they'll never work that well again. It's a rule...
ReplyDeleteVery industrious.
ReplyDeleteNEAT! NEAT! The manthings won't know what hit them.
ReplyDeleteIf you want to get better greenstuff casts out of Instant Mold, you should treat it more like a proper molding compound.
ReplyDeleteMake a LEGO mold box and a separate LEGO press:
For the mold box, build a square of Tiles on a large Plate or Baseplate and build a box around it.
For the press, build up a solid block of Bricks covered in Tiles that is the same dimensions as the Tiles inside your mold box.
Make a two-part mold by filling the bottom half of your LEGO mold box with Instant Mold, even it out with your press, and then push in your 'master' and add a few chunks of sprue to make keys.
Once that is cold, heat up an equal amount of Instant Mold, fill the top half of the box, and mash it down as hard as you can with the LEGO press. Cold Instant Mold will not stick to warm Instant Mold.
Once you have your two-part mold, mix up your greenstuff and apply it in VERY small amounts to the hard-to-reach detail areas of your two-part Instant Mold cavity. I like to press the greenstuff in with a toothpick. Then fill the remainder of the cavity, making sure to not over-fill the cavity.
Press the two mold halves together and wrap tightly with a rubber band. Let the greenstuff COMPLETELY cure before demolding.
You will be able to get surprisingly high-fidelity casts this way, and you can also stiffen a piece by inserting a piece of wire or some such into the uncured greenstuff before closing the mold.
Oh, I forgot to mention that you should remove the sprue chunks from the bottom half of the mold before making the top half of the mold. The Instant Mold will fill the cavities left by removing the sprue chunks, and make decent keys to keep your mold nice and aligned.
DeleteWow, thanks for taking the time to write all of this down!
DeleteMuch appreciated!
I experimented with silicon forms and two-component resin some years ago with mixed results. Never thought about making an elaborate mould with Instant Mould... And good to know that hot and cold IM won't stick.
No problem. I learned about this back in the day from a series of Youtube vids, and I am happy to pay it forward.
DeleteI can't recall if I used a little petroleum jelly for mold release or not, as I haven't used this method in a while. I don't think I did. But if your first mold doesn't separate cleanly, you can just do it over because Instant Mold is awesome.
I've used this method for arms, hands, and even torsos. It is a good way to go if you just want a few casts. The molds are cheap, but the casting is a touch time-consuming since you have to poke the greenstuff into all of the hard-to-reach details.
It makes a fun project, and a nice entrance into mold-making. These days I have a spin casting studio, so if I want something I can just make a professional grade recast. But the IM is still a great option if you only need a few pieces.